Informative, Technical
Bead Loom Weaving For Beginners – How to get started
Jul
Follow us on
weaving on a loom looks so complicated, and the loom can seem a bit intimidating, but it’s really not!
The great thing about bead looming is that you can try it out on a smaller loom, make some bracelets, start small, and see if you like it. Loads of people even get hooked after trying it.
It is rhythmic and meditative in nature and so forces you to sit still for a while, calm down and focus.
Let’s face it, in our world today it is very hard to do that these days.
There is so much that demands our attention that we hardly have some time for ourselves to unplug and relax. Weaving on the loom helps you to do just that, unplug, slow down, and relax, all the while creating something beautiful.
This article will provide you with an overview of what is involved with bead weaving and what you need to get started.
Choosing your loom
Which Loom is best for your needs?
It all depends on what you intend to create with your loom. Here are some things to consider:
Are you just trying it out to see if bead weaving is something you might like?
Are you planning to create more complex pieces than just bracelets?
How long and how wide are the pieces you intend to create?
How much are you willing to spend?
How hard is it to learn?
Here are some suggestions based on previous the questions
Is bead weaving on a loom for you?
Bead weaving on a loom is easy to grasp, and weaving on a smaller loom is sometimes easier than weaving on a larger one. I say sometimes because smaller looms tend to move around such as the Beadalon Jewel Loom, while larger ones are heavier and tend to stay put, eliminating that fiddly factor. Just be aware that some are more stable than others and not all looms are created equal. Shop around and see which one fits your budget and appeals to you. I advise however that you choose one that has some kind of mechanism that will help to put some tension on your warps by tightening them.
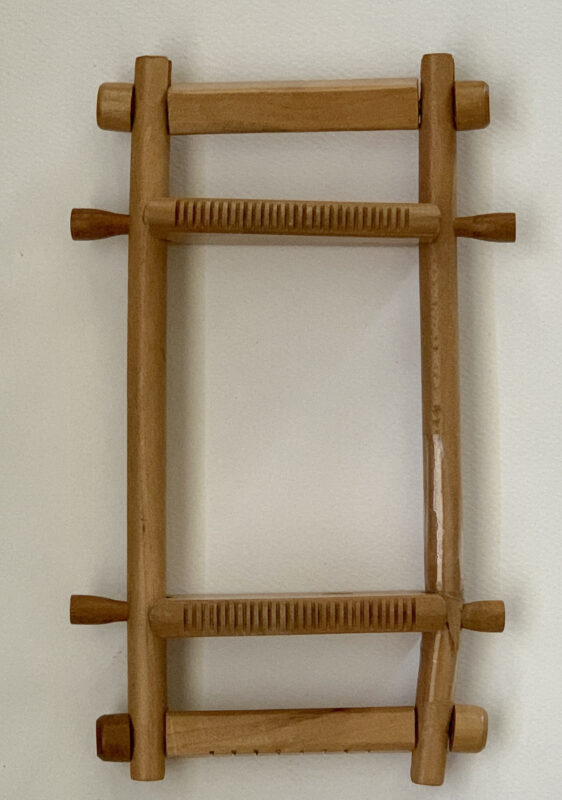
My Very first bead loom.
This loom was packaged as a toy, with some size 8/0 low-quality transparent beads. You can see that this loom is not of good quality, and I managed to brake it when tightening the tension (bottom right). I first taught myself how to bead weave on this loom. This catapulted me onto my bead weaving journey by designing my first DIY loom and then the second, and the rest is history… well, my beading history that is.
Are you planning to create more complex pieces than just bracelets or bookmarks?
If you are planning larger pieces than bracelets, you might want to consider a loom that is a bit wider and longer or has a roller where you can roll and release your warp threads. You could also use a small loom and then join the woven pieces together to form a larger piece. This is a great option if you have very limited space and a limited budget.
How long and how wide are the pieces you intend to create?
If you are creating long pieces then you might consider a loom that has a roller, where the warp is fixed to it and wrapped tight around it and it is rolled to the desired tension. Or have a loom that allows for a continuous warp, where you can move your work to the back, exposing more space on the warp threads along you to create longer pieces.
How much are you willing to spend?
What is your budget? How much are you willing to spend to see if bead weaving on a loom is a thing for you? If you have a small budget then start small with a simple beading loom and see how you go. You’re thinking… how would I know if I can only create a tiny project? Believe me, you will know.
If you are looking for a larger loom Mirrix has great looms in a range of sizes, albeit hard on your wallet. I would not suggest any other large bead looms because none offer the tension control that is needed for looming with beads.
I do have a DIY option for you though… read on…
DIY Pipe Beading Loom
You can download plans for a DIY Pipe Beading loom for FREE.
You can make yourself in any size you wish.
I have made mine on a large scale because I weave large tapestries, but you can build a loom that is smaller and fits your bead weaving style.
You will find all of the details you need in the blog Bead Tapestry Pipe Loom Plans in your free PDF file of the free Pipe Loom Plans.
Don’t let the size of this loom intimidate you, as I said you can make it as small as you wish by changing the size and thickness of the pipes. You could even modify it into a tabletop loom by changing the length of the pipes for the stand!
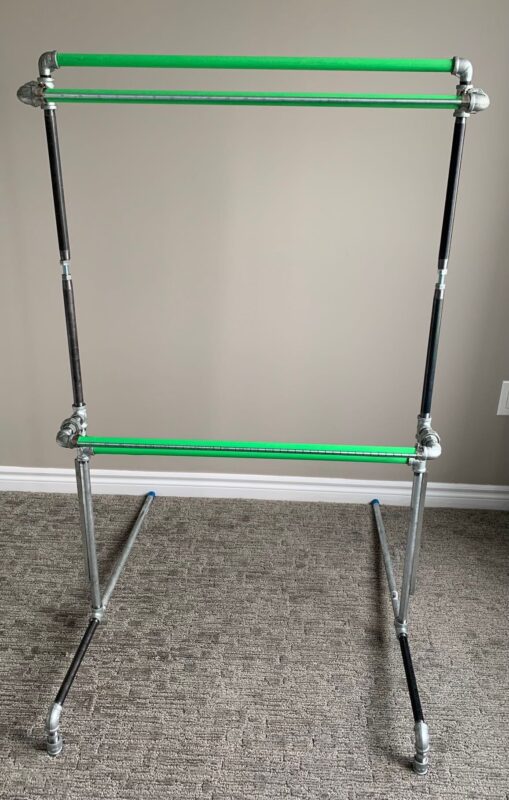
This is the loom that I have personally designed based on Archie Brendan’s fiber tapestry loom. I use this loom, and so I can say without a shadow of a doubt that it is awesome.
And it costs just a fraction of what other leading looms on the market cost these days.
How hard is it to learn?
It is really not that hard. You can make it as easy or as complicated as you like. It all depends on what you want your end product to be. Big or small, the number of pieces, and the number of colors used, is totally up to you and your pattern design.
But what about the weaving process itself?
It is simple enough that 9-year-olds or even younger can learn how to bead weave on a loom.
Other than the loom, what do I need?
You will need your choice of pattern, beads, beading mat, beading thread, a beading needle, and beads.
Pattern
When first learning how to bead weave on a loom, be kind to yourself and choose a pattern that is not very complicated. Choose a pattern with a low number of colors and a low number of columns (Beads going across). Start with something like a bracelet or a bookmark. You will gain confidence in doing this and build your way up to bigger pieces.
Pinterest has a slew of smaller-sized patterns, you will also find instructions there and loom suggestions!
Search for ‘small bead loom weaving projects for beginners on Pinterest’
or go to this link… to see what is on Kim Robinson’s Board
We offer some larger patterns for free in our shop in various degrees of difficulty. Head on over to the Free Tapestry Patterns page when you feel like you can handle a bit of a larger piece.
Beads & Beading mat
Make sure you have all the beads that the pattern calls for, and in the correct amount.
You will need a beading mat to lay out the beads in tiny separate piles in order to easily pick them up with your needle. To start off with a Microfiber cloth will do! Lay it in a shallow tray.
Make sure to label your small bead piles.
If the messiness of bead piles does not appeal to you, then you can use small drink bottle caps or sauce dishes to keep your beads separated and organized. Remember to label your beads!
Beading Thread
When starting to weave on the loom and trying to determine if this is a thing you would like to pursue, there is no need to go and buy a bead weaving thread.
Basically, what you need is a non-stretchy thread.
The very first test patch I did was with ordinary white cotton thread. Why white? Because some beads may be transparent or translucent, and the white color helps with the best translation of the color of those beads.
Beading Needle
Do you really need one?
The answer is no. Not with smaller pieces, here is why.
What differentiates beading needles from other needles is their length. Granted the needle will need to be thin enough to allow for multiple passes through a bead, so any size 10 or thinner (12 and up) will do. Of course, this all depends on the size of the bead!
If you are using larger beads than Miyuki Delica 11/0 beads (I recommend the larger size for your first piece) then you will find that you can use thicker needles.
Beading needles are made long for a number of reasons, the main reason being the ability to load a larger number of beads onto the beading thread and then to pass through a larger number of beads when weaving the beads onto the warps. Since you are not going to start off with a big piece, a shorter needle will do nicely.
Along with the basics mentioned, you will need
Thread Snippers or Scissors
For this project, any pair of scissors will do. The smaller the scissors the more control you will have when using them. You don’t want to be cutting the warp threads by mistake!
Pencil & Eraser
You will need to mark off the rows on the pattern as you go along, the pencil is great to use at the start because you can erase when you have made a mistake and need to see the row again to correct it.
A note of caution, some pencils can transfer grey lead onto your hands which can be in turn transferred onto your beads and thread, be mindful of that, or choose another pencil!
Teaspoon
Use a teaspoon to corral your beads if they get out of their neat little piles. Scrap one of the long edges gently along the Microfiber cloth.
And that is all. Let the fun begin!
Once you gather all of the materials that you need. You are ready to start your first piece!
I’m so excited for you! You are going to love bead weaving on a loom!
Just remember to be kind to yourself and be patient.
If you do choose to take up bead loom weaving, and I really hope you do, please consider keeping this first piece as a memento or at least take a photo of it. I didn’t, and I regret it to this day ( I could have shared it with you!). It is so great to look back at your work along your bead weaving journey and reflect on how far you have progressed.
If you enjoyed this post…
You might also like to read these posts too:
lATEST POSTS

Best Thread Color to Use with your Patterns
What is the best thread and thread color to use for weaving your bead tapestry?
Dec

Best Way to Weigh Your Beads
How best to go about weighing the beads in your stash before purchasing more for[...]
Dec

How BT is Helping You to Weave Large Bead Loom Tapestries
All things beading, bead looming large tapestries and digital planning for beaders.
Mar

Hi there! I’m Nedal.
I created Beading Treasures to make information about beading large tapestries more accessible, and in doing so encouraging creating of this amazing art form.
Weaving big can seem intimidating but by using some techniques it is totally doable, no more than that it is really enjoyable!
If you’ve found this blog helpful, please support me by choosing the affiliate products on my blog and following me on my social platforms.
Don’t forget to check out the shop.
Thank you!
Nedal Douaihy, Artist & Founder