Technical
Looming Large Tapestries – In One Piece or Several?

Jul
Follow us on
How to go about weaving large tapestries?
This is such a personal choice, a choice that keeps changing.
Sometimes I would feel like doing a large tapestry… say 300 beads wide in one go. Sometimes I feel like doing the tapestry in smaller pieces for example in two halves.
I can hear you saying… 150 beads across is still a large tapestry!!
Yep, it is.
You can weave your pieces even narrower, say.. 4 pieces of 75 beads wide each.
This makes the looming of a large piece less daunting right?
In this post, I’ll be talking about the difference between weaving a large tapestry in one piece versus beading it in pieces.
What to Consider?
So you have a pattern for looming a large bead tapestry…
Whether you work from a word chart or a grid pattern, there are multiple pages to deal with. Sometimes this can be so daunting that you would put it away for a later time…
Please don’t. Hopefully, this post will help to make it less daunting and dare I say, more enjoyable.
So…
How do you go about the process of the bead looming of a large bead tapestry?
Should you use a big or small loom?
Can you fit all the necessary warps across your loom?
How do you join these pieces when you are using a big loom?
Which is faster? Weaving in one piece, or weaving smaller pieces?
And the list of questions goes on and on….
Let’s take the questions that we have listed for now and break them down.
How to go about the process of bead looming a large piece?
Choosing your preferred pattern format, Wordchart, or Grid?
Some bead weavers prefer working from a word chart others from a grid. Whatever your preferred method, you will need to organize your pattern pages according to the pieces you plan to weave to avoid confusion.
Most of us weave in the method we first learned how to weave in… mine is off a grid pattern. That does not mean that you cannot change to the other method at any time. This could be loads of fun!!
Wordcharts
Working with wordcharts for larger tapestries can be a little bit faster than working from a grid because it counts the beads for you.
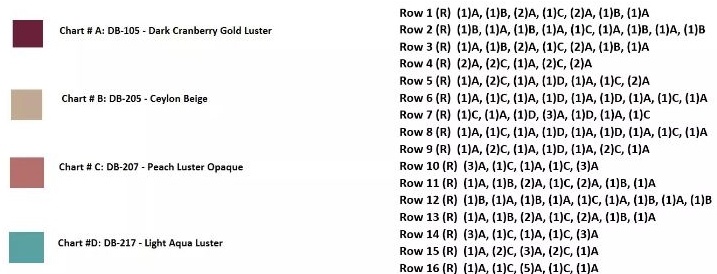
There is a lot on there but for now, let’s focus on Row 1 where it says (1)A.
[I’ll explain the (R) Is explained a bit further down]Row 1 (R) (1)A, (1)B, (2)A, (1)C, (2)A, (1)B, (1)A
This says that you need 1 bead of color A.
By looking at the chart you can tell that A is the DB-105 Dark Cranberry Gold Luster.
The Same goes for the rest of the row. The number of beads needed is inside the brackets, and the color of the bead is right next to it before the comma.
Using a wordchart is good for when you are weaving a large tapestry all in one piece. The best part is that it tells you how many beads are needed in a certain colour.
But here is the caveat…
You need to make sure and check that you have loaded the correct number of beads in the proper sequence. Correcting mistakes can then be a bit more difficult, because of the lack of visual representation. I’ll expand a bit more on that on that later.
For some, it is much easier to work with symbols rather than letters representing the bead color.
I prefer to work from a symbol grid pattern.
Grid Pattern
Grid Patterns make it easier to visually see the tapestry and, if desired, divide it up into pieces to bead.
Say you have a grid pattern for a tapestry that is 300 beads wide, and the grid pattern spans 4 pages.
You can decide, for example, to weave one page at a time, which would be 75 beads wide or to weave 2 pages at a time which would be 150 beads at a time.
Or if you want to bead all 4 pages at once!
This is my preferred method, and here is why.
I can decide whether I want to start from left to right or right to left and top-down or bottom-up depending on which way I like to bead, just by looking at the chart. Ok, maybe I need to mark some things on the chart to make it easier but that’s about it.
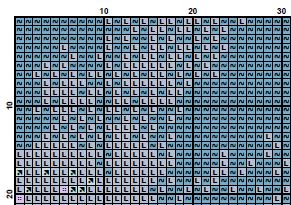
Looking at the pattern you can tell that the pattern goes from left to right in 10 beads increments.
And it goes top-down in 10 beads increments.
This is great for when your preferred method is to bead top-down. But what if you want to bead from the bottom up?
No big deal, just start from the bottom. I don’t even bother to change the number of the rows on the left, since I will be marking the rows off one by one. That’s what keeps me on track.
That covers the vertical aspect… what about the horizontal?
Let’s say I want to go from right to left on the grid pattern.
It should say, 10, 20, etc starting from the right.
Well, all I need to do is mark on the grid my reversed order starting from 0 in ten beads increments all the way up to 300.
That’s it. It is done, and it is easier to see because of the visual representation of the beads and the tapestry as a whole.
Whereas on a wordchart it specifically tells you where to start, and changing it is not as easy.
Row 1 (R) (1)A, (1)B, (2)A, (1)C, (2)A, (1)B, (1)A
So reading the row above from the wordchart you will have to start loading the beads onto the weft from the right (R).
What this means is that when you go to weave the weft back through the beads to lock them into place, you need to pass the needle back from left to right.
This is mainly designed for left-handed weavers. Because to do this, the needle will have to be in your left hand. Going from the right side of the row passing back through all the beads in front of the warp threads heading left.
Another thing, let’s say I made a mistake and omitted a bead while I was loading them on the weft for the row. I can easily go back on the chart and see visually where I missed that bead.
You’re thinking you can easily see where you have gone wrong right?
Not so much…
How to tackle the weaving
Weaving the tapestry in one piece
Size of the Loom
When weaving the tapestry in one piece, you need to make sure that your loom is wide enough, and tall enough to accommodate the number of beads across and how tall the tapestry is going to be.
Are there enough dents for the warps across the width of the loom? Keep in mind, that you always need one extra warp.
You will need to calculate how tall your tapestry is going to be. You can do this by multiplying the diameter of a bead of the type that you will be using, by the number of rows in the pattern.
If you don’t know what the diameter of the single bead is, make a swatch of 1 inch x 1 inch on the loom then count and measure to make sure. Put your ruler or measure flush against and parallel to the warp and count the number of beads the sample has lengthwise as in going up or down as you are looming (not from hole to hole). This will work with any kind of bead but bear in mind that some beads are not uniform in size and so the measurements of your tapestry might differ.
I like to use the metric system when working with beads because the beads are so tiny, I find that using the metric system gives me more accurate results for my calculations.
1 inch = 25.4 mm
The Delica 11/0 beads have a diameter of 1.6 mm
Calculate how long your tapestry is going to be, depending on the average length of your bead type. Do this by :
multiplying the average size of your bead diameter by the number of rows in the pattern.
Let‘s say my pattern has 100 rows
1.6 x 100 = 160 mm
The length of the tapestry is 16 cm
Then use a measuring tape to measure from the back to the front of the loom making sure that you leave enough space on the warps on each side so that they can later be tucked into your work.
More bead colours per row
Since you will be beading right across the width of your tapestry, depending on the number of colors used, you will most likely have to deal with more colours on your bead tray all at once.
This can be done. It is just an organizational matter.
Your muscle memory will develop and the work will speed up as you progress with your weaving.
More time is needed to load the beads onto the weft
You will need to spend more time picking up the beads for one row if you are weaving the tapestry all in one piece. That’s a given. But you will need to weave the beads in for that row only once. This brings me to the next point…
The weaving goes faster, depending on…
Yes, the weaving goes faster once you have muscle memory and you are familiar with the position of the bead colours. You load the row all in one go and cross off the loaded beads only once, as opposed to doing that for every piece.
Weaving tapestries in several pieces
When doing this style of bead tapestry weaving you need to consider how you will be joining the pieces.
Is your loom large enough to accommodate all the pieces so that they can be joined on the loom as you go? If not then you will be left with no other option other than joining the pieces off the loom.
This will be an extra step in weaving your tapestry and joining the pieces off-loom can take longer than on-loom because with the on-loom joining method, the tapestry pieces are stabilized in place and less fiddly to work with.
Weaving in smaller pieces means that mistakes can be located and corrected a little faster because of the smaller size of the piece.
It is also slower because you will be loading the beads onto the weft then weaving them onto the warp and crossing them off the pattern for every piece.
I don’t like to join my pieces off the loom because larger tapestry pieces are a bit heavier and so harder to handle, and doing so allows for more mistakes. But can it be done? Absolutely.
This Large Format commissioned tapestry piece was done in 7 pieces and joined off-loom. It was designed to drape like material but with the shimmer and reflection and transparency effects that are unique to beads

If your loom is small and you are doing multiple pieces, intending to join them horizontally…. depending on how you finished the warps the joining of the pieces can be more difficult. You will need to modify the way you finish your warps to accommodate that. But it still can be done.
If you are thinking you need a larger loom, we have FREE downloadable plans for a bead tapestry pipe loom that you can download, purchase the parts from the hardware store or even online, and then assemble your loom.
When all is said and done
However you choose to weave your large tapestry the end result is sure to have a wow factor.
Large tapestries are usually seen as precious, by virtue of the hours and work it took to complete them!
Large tapestries, when given gifted are treasured.
Why not make your own treasure today!?
If you have already made a treasure please share. I would love to see it!
If you enjoyed this post…
You might also like to read these posts too:
lATEST POSTS

Best Thread Color to Use with your Patterns
What is the best thread and thread color to use for weaving your bead tapestry?
Dec

Best Way to Weigh Your Beads
How best to go about weighing the beads in your stash before purchasing more for[...]
Dec

How BT is Helping You to Weave Large Bead Loom Tapestries
All things beading, bead looming large tapestries and digital planning for beaders.
Mar

Hi there! I’m Nedal.
I created Beading Treasures to make information about beading large tapestries more accessible, and in doing so encourage the creation of this amazing art form.
Weaving big can seem intimidating but by using some techniques it is totally doable, no more than that it is really enjoyable!
If you’ve found this blog helpful, please support me by choosing the affiliate products on my blog and following me on my social platforms.
Don’t forget to check out the shop.
Thank you!
Nedal Douaihy, Artist & Founder